Finding a Clef Replacement for WordPress
Update: The good folks at UpdraftPlus have released Keyy, a very solid choice for Clef replacement. Ready my review here.
One of the most important things I tell my clients when it comes to WordPress security is to use two factor authentication. This is an extra security measure that requires an additional step beyond entering a username and password to login. Up until now I have used Clef exclusively on all my sites to enable two factor authentication. In fact it’s been part of my standard WordPress stack for quite some time. Which is why I was saddened to learn recently that Clef is closing its doors. It has been such a great plugin and lets me rest easy knowing that even if a password gets stolen, there’s not much an attacker can do with it. My clients also loved using it and appreciated not having to remember their password. There was also the sheer wow factor of pointing your phone at a bunch of moving bars to login to your website.
But enough dwelling on the past, the show must go on. Clef may be closing down, but attackers will only get more persistent. There are several options for finding a Clef replacement for WordPress. Keep reading to find out more about what’s available, their pros and cons, and hopefully find a solution that works for you.
Clef Replacement for WordPress
As the Clef blog post alluded to, there are several options when it comes to a Clef replacement for WordPress. There are tons of two factor systems available, but finding one that integrates with WordPress is the key. From my research the following systems offer two factor authentication and have WordPress integrations:
- Authy
- Duo
- Google Authenticator
In the following sections we’ll take a closer look at each of these offerings. Keep in mind that with any of these, you may lose some functionality, such as XML-RPC. This might be ok for most folks, but many plugins and apps rely on these features to work (such as the WordPress iPhone app).
Authy for WordPress
Authy is a great platform and is used by a number of large corporations (CloudFlare, for example). It provides two factor authentication via a mobile app, SMS, and other mechanisms. It has the “coolest” UI of the 3 I evaluated, for whatever that is worth, but also fits the bill as a decent Clef replacement for WordPress.
Authy Setup
To get started with Authy, install their plugin from your WordPress admin console or download it from here and install manually. Because Authy is part of the Twilio family, you’ll first need to create a Twilio account. Once this is setup, you’ll see the Twilio account page:
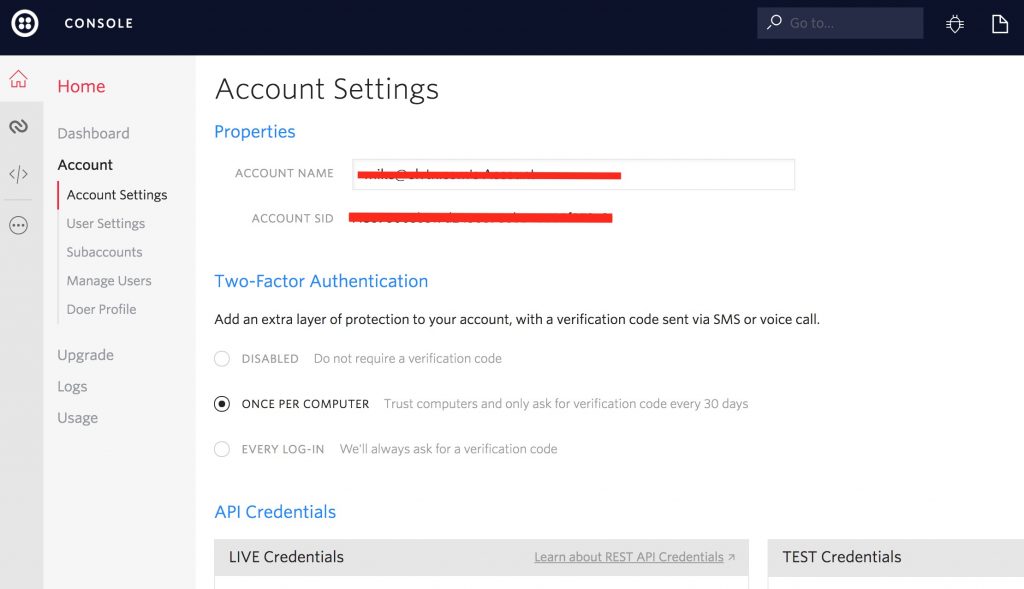
From here, you need to create a new application. On the main menu on the left, click Authy -> Applications -> Create Application:
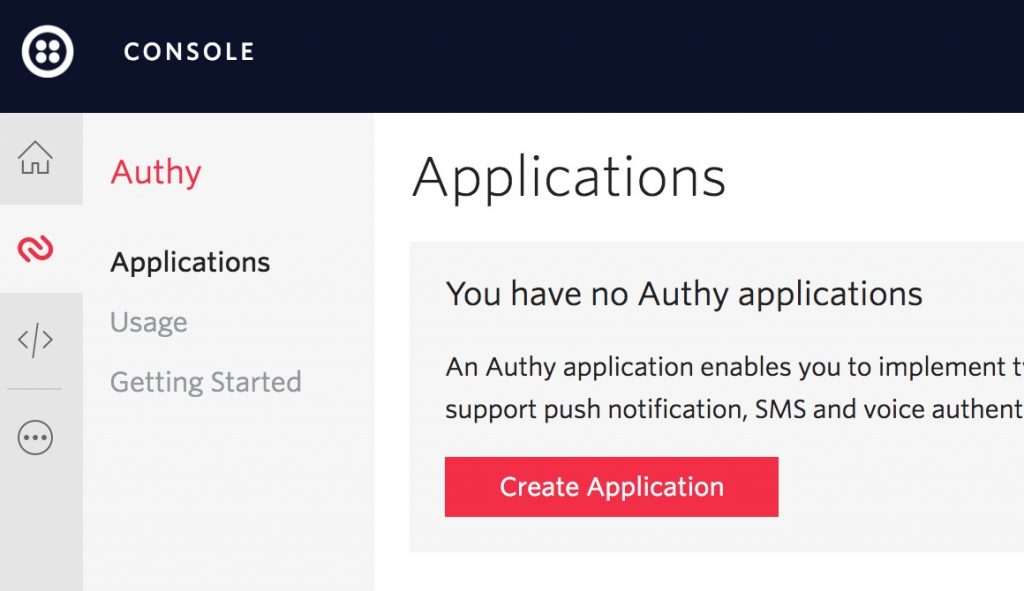
You’ll be asked to provide a human friendly name for your Authy application. I recommend using your domain name, though it only allows alpha-numeric characters so you’ll need to drop the top level domain (i.e. .com, .net, etc):

After this, you’ll be taken to the application configuration screen. For the most part I found the default settings are appropriate, but you can change them to suit your needs. If you’re not sure, just leave the defaults as-is. You can always change them later.
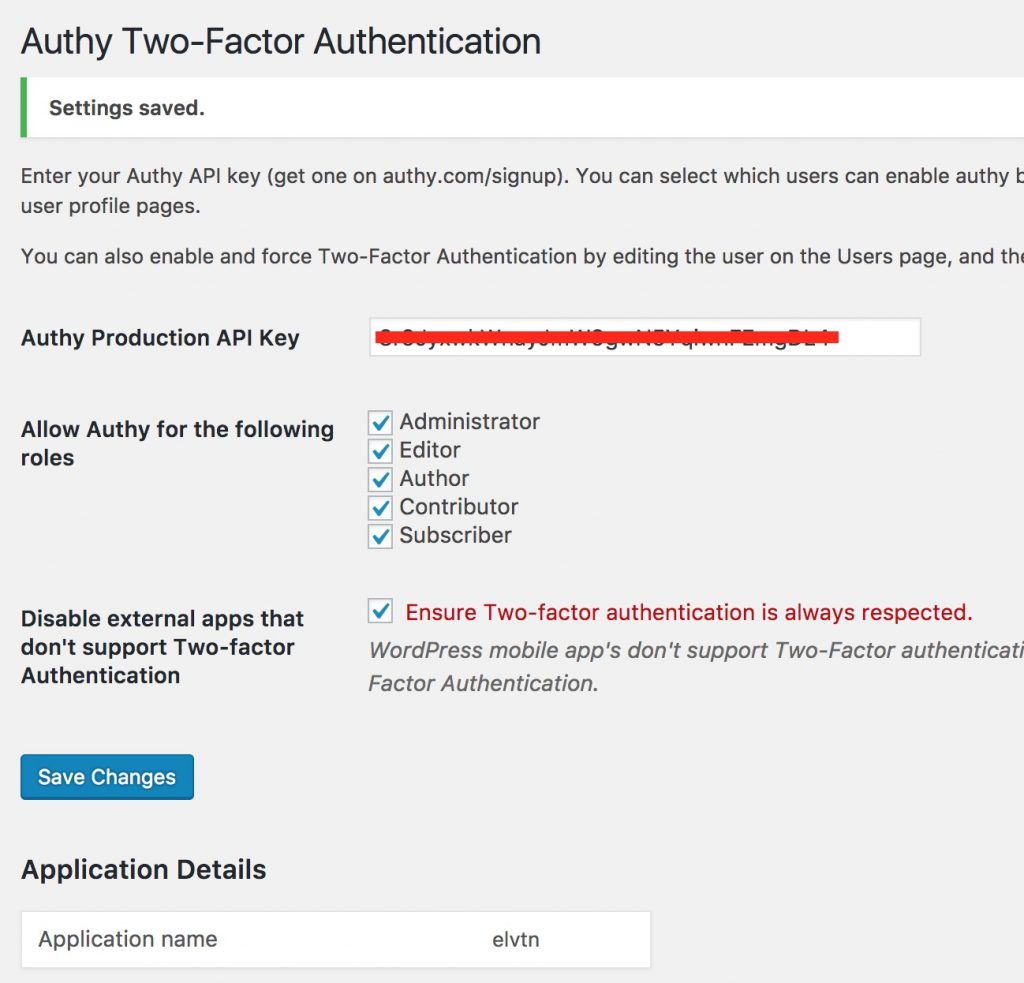
The next thing you’ll need to do is copy the Production API Key (click the eye icon to show it) and paste it into the Authy plugin settings. You can do this on your WordPress site by clicking Settings -> Authy, entering your API key, and then clicking save. If it works, you’ll see a success message and you should notice your application name at the bottom of the configuration panel:
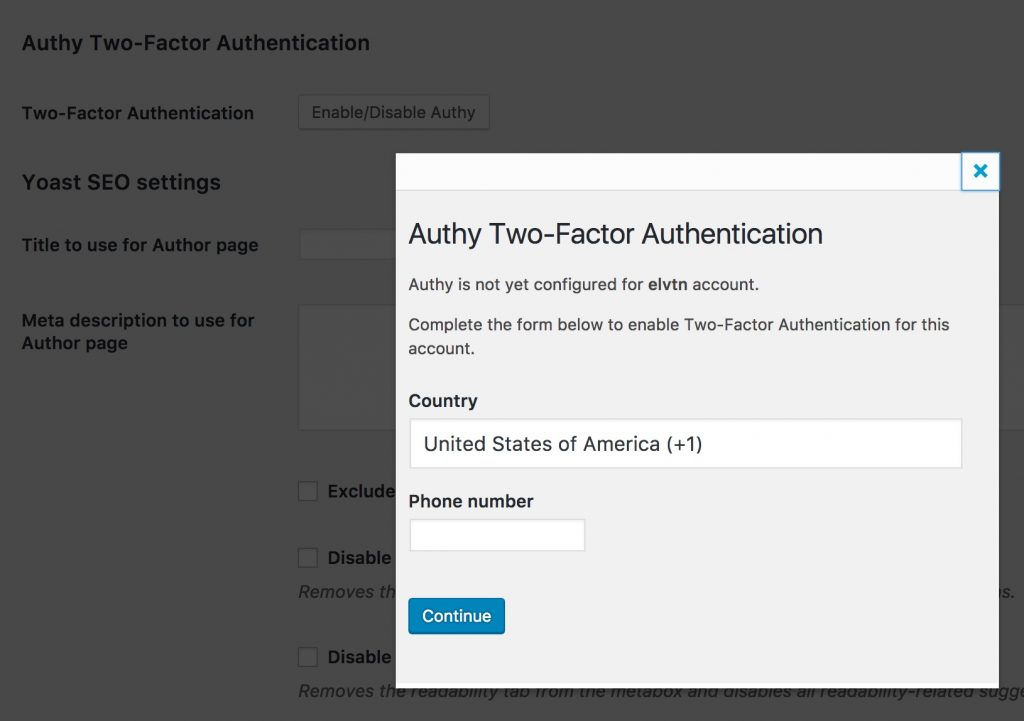
The last step is to configure your user(s) to use Authy. Click the Users menu in your WordPress admin screen, click a user, and scroll down until your see the Authy section. There is a button to enable Authy for the user, which when clicked, will prompt for a phone number. The phone number is used to send the user a link for the Authy mobile app:
That’s it! Now whenever you login to the WordPress admin console, you’ll see a slightly different form. Once you enter your username and password, you’ll be presented a new field asking for the Authy code. If you have the mobile app installed, you can open it to approve the login. Alternatively, you can open the app and enter the code manually (or enter the code from an SMS message if you don’t have the app installed).
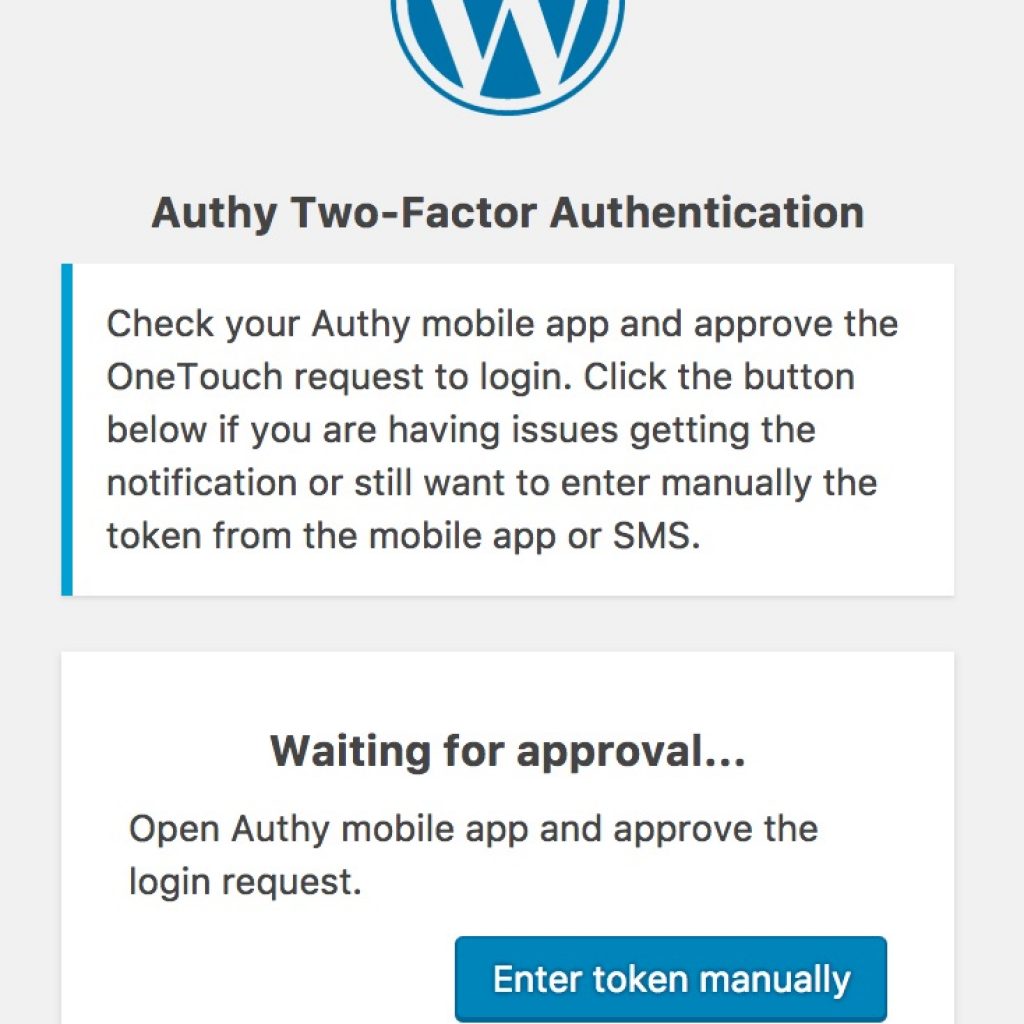
Authy Summary
Authy is incredibly feature rich and is used by a number of large enterprises, so in theory it should stick around for awhile (of course, I thought the same thing about Clef). It allows two factor authentication via multiple mechanisms including push notification via mobile app, SMS messaging, and even automated phone calls. I also really like that they offer a free tier in which you get unlimited users and up to 100 auths per month. For most small sites with 1-2 admins this should be plenty, especially because every login doesn’t require an auth (if the system remembers your computer and location). There is also a pay-as-you go plan which you pay for only what you use, and auths start at $0.045.
The big downside I found with Authy is the setup. Having to create a Twilio account first, then an Authy account, was a little confusing at first. You also have to enable Authy per user, which may be cumbersome for some sites with many users. With Clef, you could enable it by role, meaning you could require all admins to use Clef with a single click. With Clef it was also easy to enroll new users by sending e-mails with download links to the mobile app. With Authy, each user has to self-enroll by visiting the Users page, something they may not be comfortable with. Clef also let you disable password logins per role, something that is missing from Authy.
Duo for WordPress
Another great Clef replacement for WordPress is Duo. Duo works similar to Authy in terms of setup and using a dedicated mobile app to stream line the two factor login process. Setup was much simpler since it was only one account, not two. And many of the same features were present with Duo that I found in Authy, such as using push notifications, SMS, or voice calls to authenticate.
Duo Setup
As with Authy, the best starting place is with the WordPress plugin. Install it from your admin console, or download the plugin here and install it manually. After that you’ll want to create an account Duo here. After signing up for Duo, you will see a dashboard where you can create new applications. Search for WordPress and then click Protect This Application to configure it:
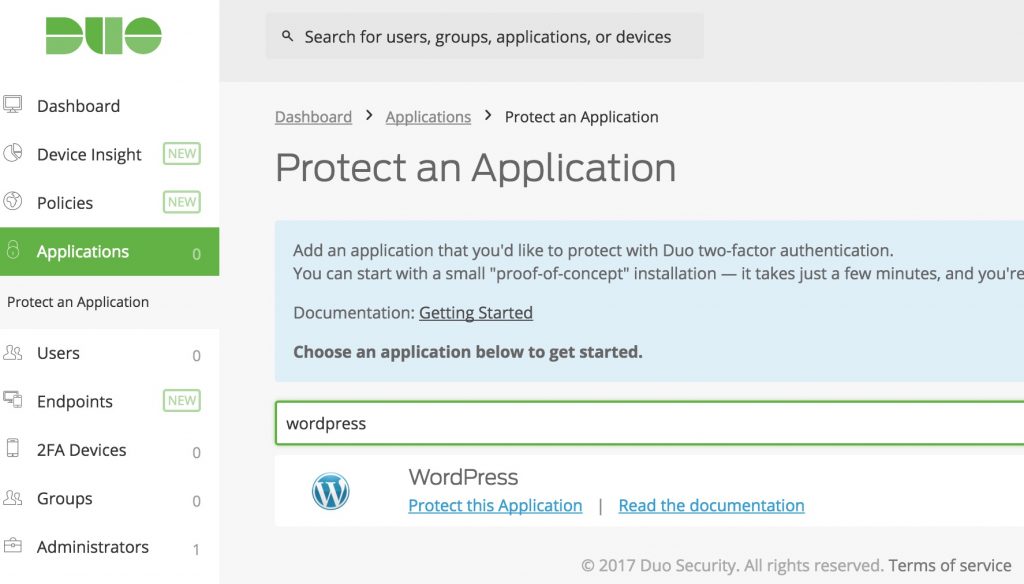
Clicking Protect This Application automatically creates a new integration and secret key pair, which you’ll need to enter into the WordPress plugin. You can also configure different aspects of the integration, such as limiting the authentication types (SMS, voice, push notification) and much more. As with Authy, I found the out-of-the-box settings to be sufficient, but make sure you read them carefully to ensure they work for your needs.
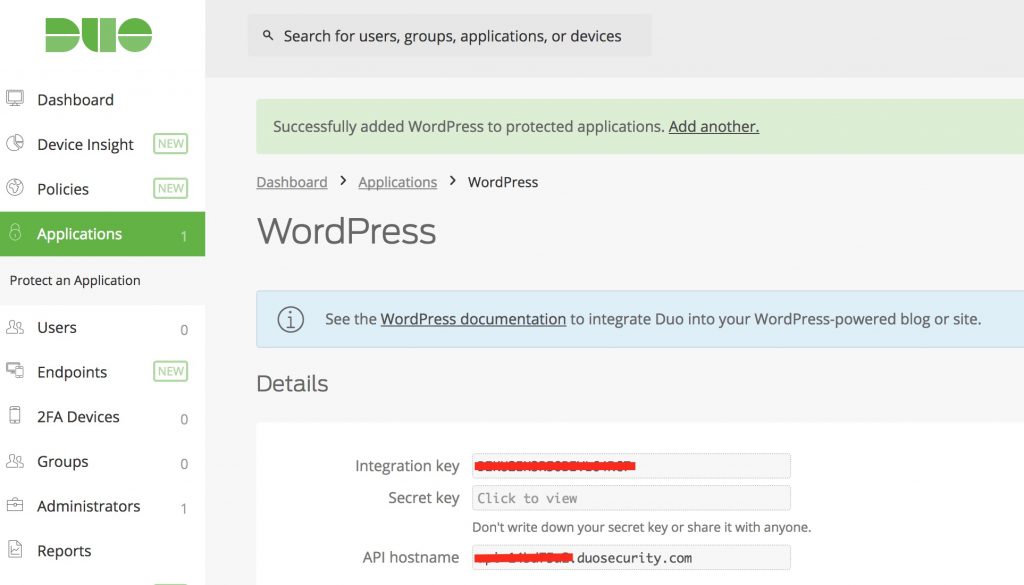
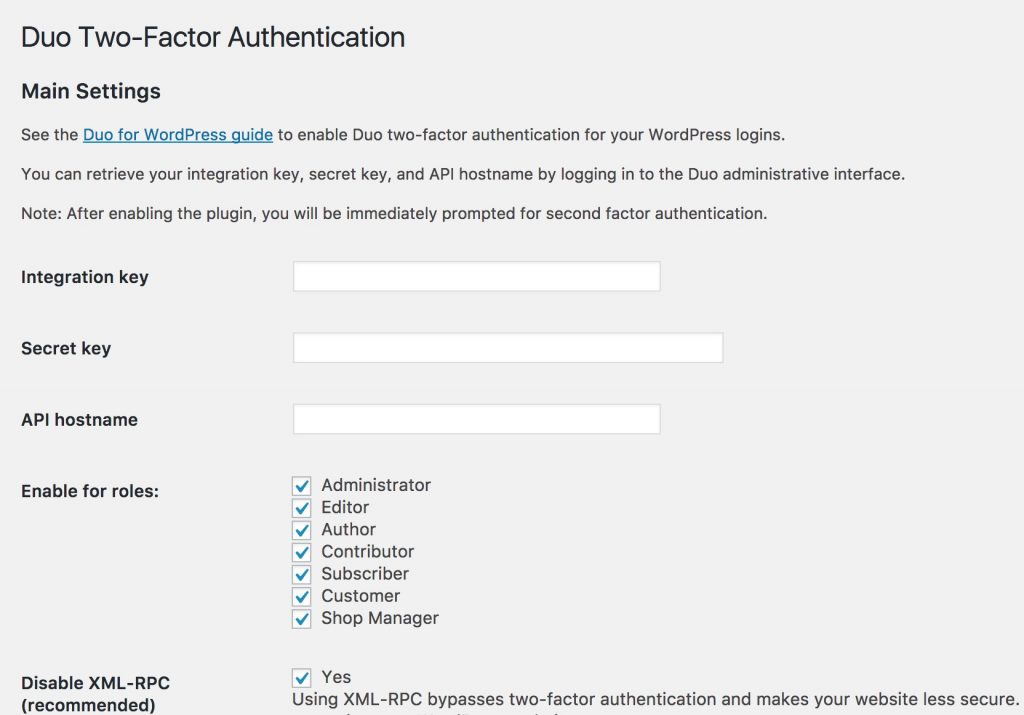
Once you’ve configured the WordPress integration in Duo, visit the WordPress plugin settings under Settings -> Duo Two-Factor. You’ll need the 3 fields from above to copy/paste into the plugin settings. You can also enable Duo per role from here, as well as disable XML-RPC globally since it would bypass any two-factor authentication.
With everything configured, the next time you login your WordPress login window will look as follows:
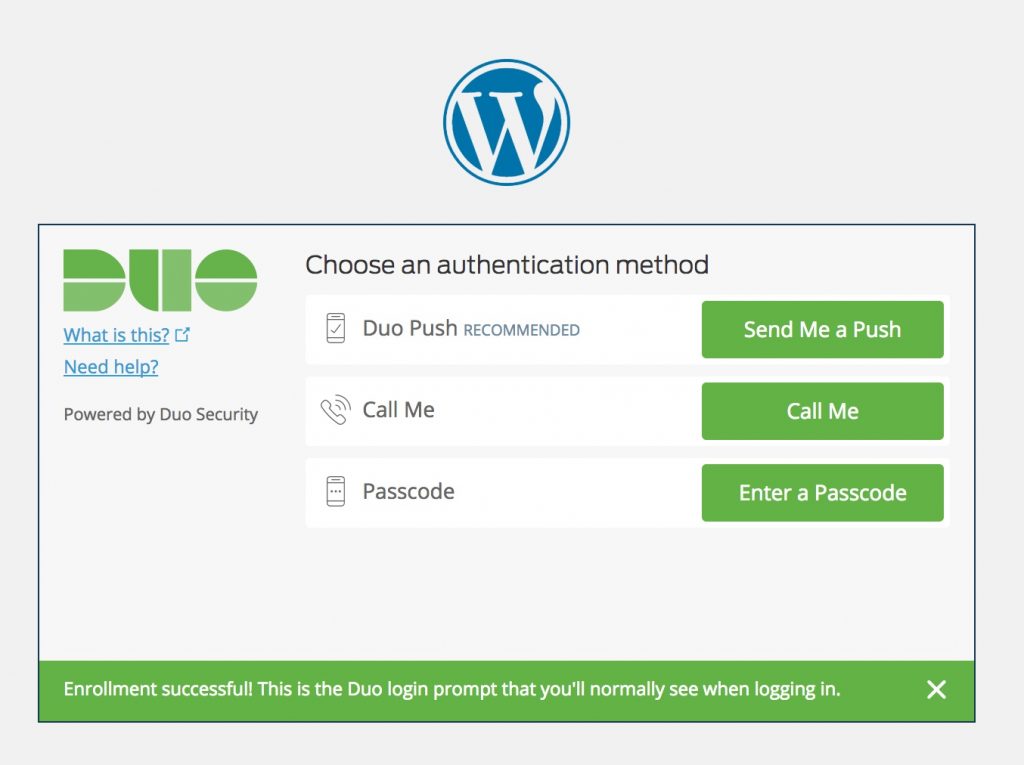
From here you can use any of your configured two-factor methods: push notification, voice call, or SMS. I like the push notification because it requires me to unlock my phone using a passcode or thumbprint, which provides another layer of protection.
Duo Summary
Duo offers a free pricing plan that allows up to 10 users and unlimited two factor authentication, which should be enough for most users. If you manage a few sites, all of your users could be under a single Duo application, which would let you be the single point of management for all your clients. If you have more than 9 clients, you would need to have each client configure Duo, which could be difficult if your clients are not comfortable with setting it up. Another nice feature is once enabled on your site, you can enforce Duo per role instead of per user. You can also leave XML-RPC enabled without Duo, which is nice if you use the WordPress app or other 3rd party tools to manage your blog.
Duo also offers some sophisticated configuration for their WordPress applications. You can go as far as setting up group policies for different users, each with their own settings. You can control users and groups by location, browser, device, and much more. Most users will find the default settings are adequate, but if you manage more than 10 users and use one of their paid plans, you might find the advanced settings useful.
Google Authenticator for WordPress
Google Authenticator is the service Google uses for two factor authentication across their platforms, and there are multiple plugins that integrate it into your WordPress site. I’ll specifically look at a plugin from a company called miniOrange. They offer a free service plan with unlimited authentication for WordPress which I’ll talk about below.
Google Authenticator Setup
Stop me if you’ve heard this before, but start by installing the plugin (also available in the plugin repository). The first thing I liked right away was that account setup all occurred within my WordPress site. With Authy and Duo you have to perform initial setup on their site, but with miniOrange you can do everything on your own WordPress admin screen.
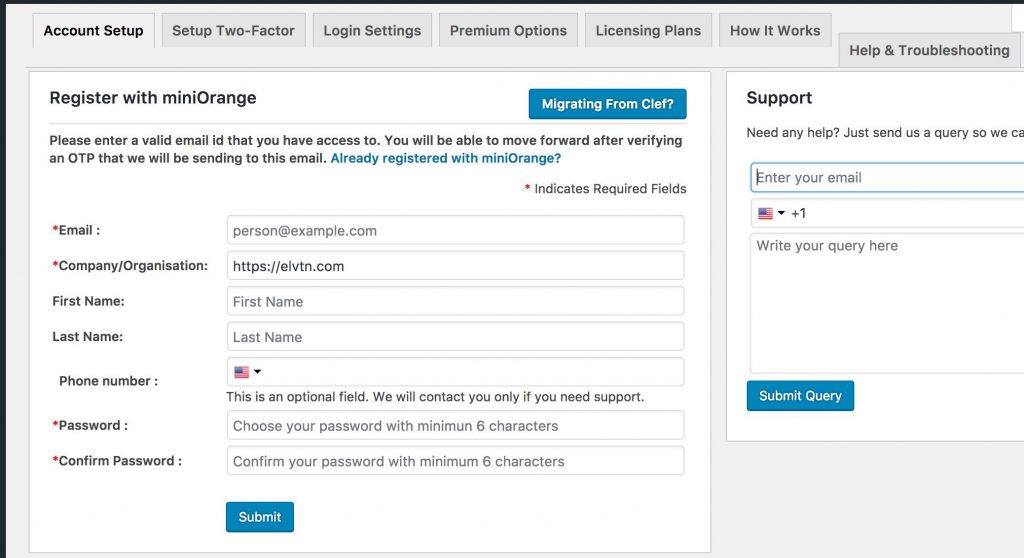
Note that completing setup requires a One-Time Passcode (OTP) be sent to your e-mail address and entered into the setup screen:
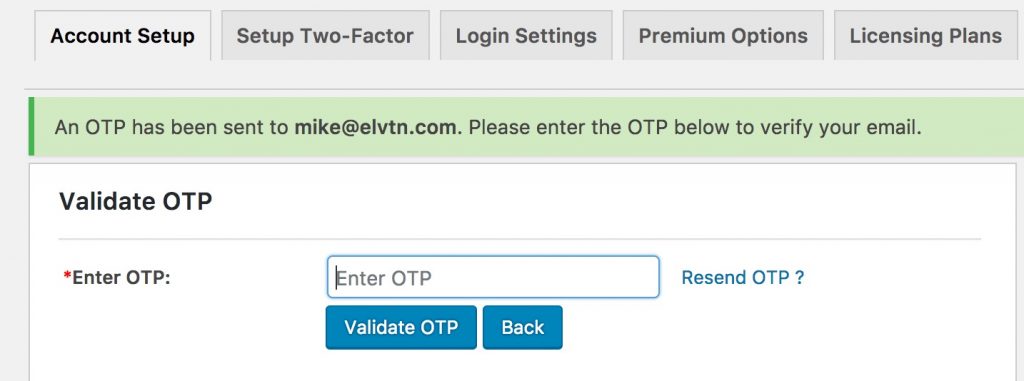
Once you’ve setup your miniOrange account you’ll be redirected to the pricing screen. As I mentioned earlier, they offer a free tier, which is the default. This is really just an upsell screen so just click the blue button in the top right to move on. The next step is to begin setup of two factor authentication, by clicking the Two Factor tab in the miniOrange screen:
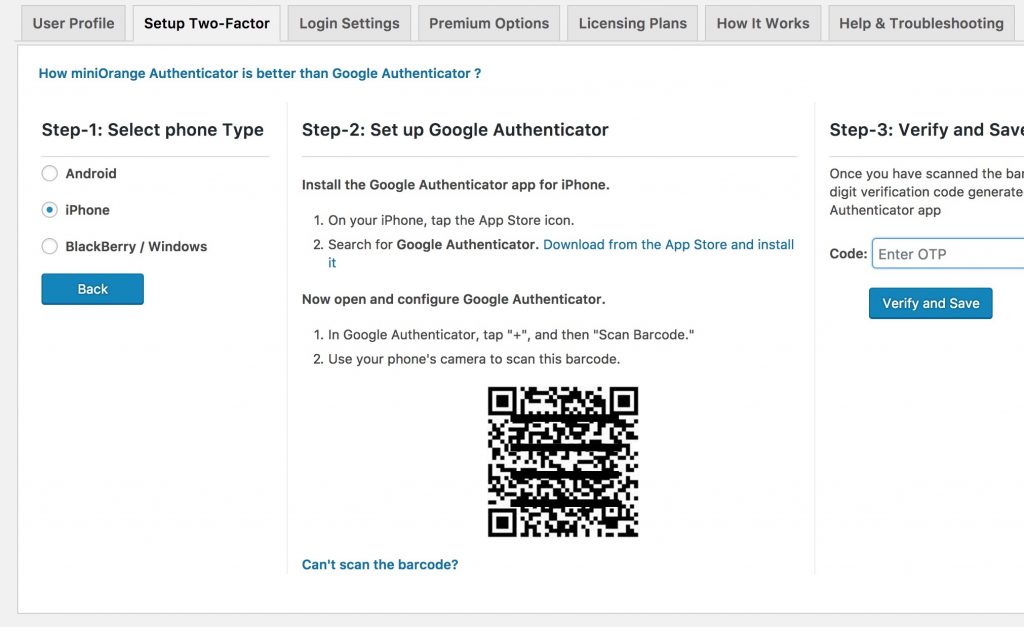
Start by selecting your device. Make sure you have the Google Authenticator app installed on your device before proceeding (it can be downloaded for free from your respective device application store). Use it to scan the QR code on the miniOrange screen, and then enter the 6 digit OTP the app provides. Note the OTPs are only valid for a brief time (20 seconds) so if you wait too long you may need to re-enter a new code if validation fails:

Just click Begin Setup and snap the QR code from miniOrange to get the OTP. Once you validate the OTP, you will be asked to select a two factor authentication method. In the case of miniOrange, the free service plan offers a few options (the premium version puts it on par with Authy and Duo in the sense that you can use voice and SMS options). Be aware that some options require the additional miniOrange app, not just the Google Authenticator app you already used during setup. For my purposes and to keep things simple, I chose the Google Authenticator method, which does use the app I already installed. Now when I log in my screen looks something like this:
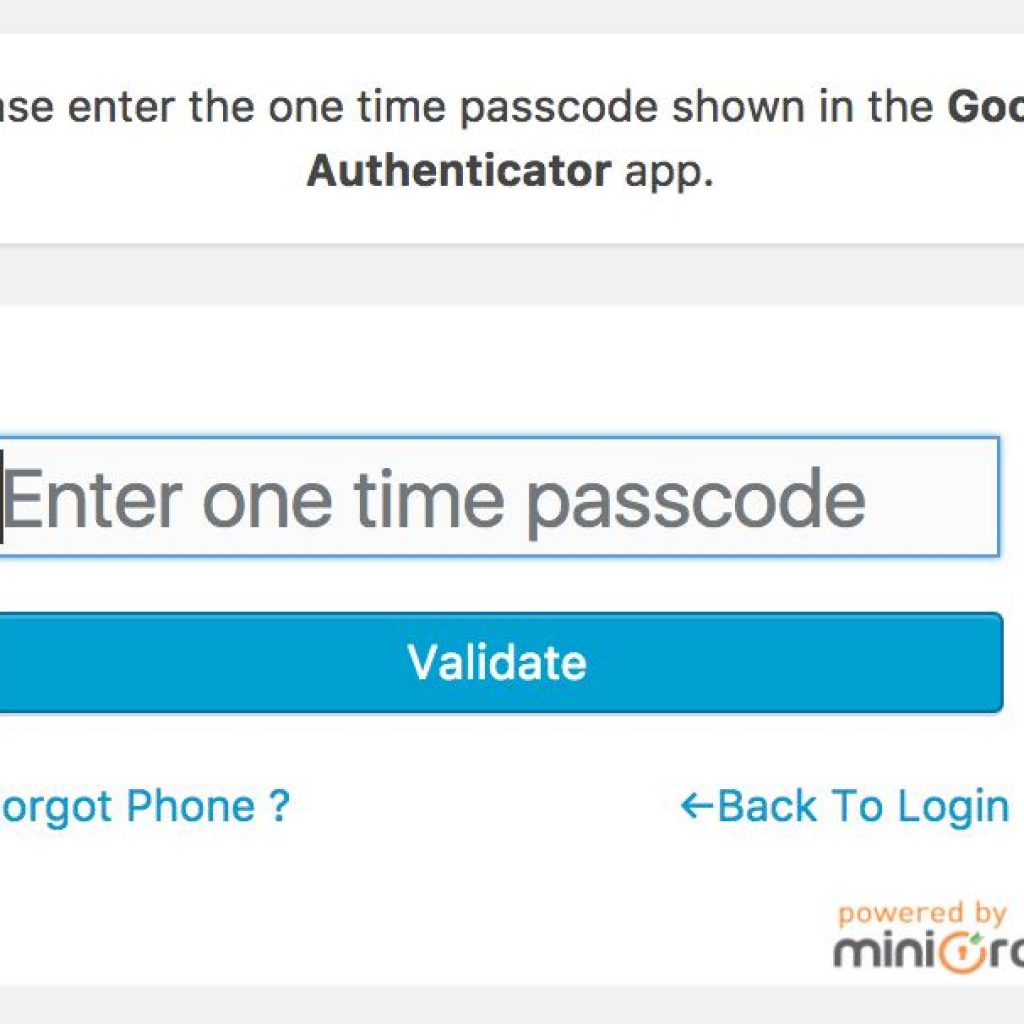
All that’s left is to open the Google Authenticator app, get your 6 digit code, and type it in. Again this is because I designated the Google Authenticator app as the primary two factor mechanism. The login screen will vary slightly depending on the method you choose.
Google Authenticator Summary
First, the above setup is specific to the miniOrange implementation of Google Authenticator. There are a number of other free WordPress plugins with less bells and whistles that may work perfectly fine for your needs. But at the time of this writing, the miniOrange implementation was the most feature rich that was still free, and was also the most recently updated plugin in the WordPress repository.
Overall, the setup was the simplest of the 3 systems since it was all done from the WordPress admin screen and only took a few clicks. There was no need to copy/paste credentials from a 3rd party site, which was nice and kept setup simple. Even the Google Authenticator application (which I did on iPhone) was incredibly simple to install and setup. It also supports a variety of two factor methods, even on the free plan, and even offers Knowledge Based Authentication (KBA) as a fallback (this is where you can answer some questions to regain access in the event your primary two factor method is not available).
Other Clef Replacements for WordPress
Aside from Authy, Duo, and Google Authenticator, there are numerous other Clef replacements for WordPress. I’ll list a few of them here, but they are all paid (or upcoming) solutions, therefore I cannot provide any real review. They come from reputable companies with a solid history of WordPress development, and I wanted list them here for completeness.
- WordFence: For users of the premium version, they offer cell phone sign-in which acts as a two-factor login.
- iThemes: Their premium security plugin offers two-factor authentication, which is actually built on top of some of the technology discussed above (including Authy).
- UpdraftPlus: The developers of one of the top WordPress backup plugins around, they recently announced they would be offering two factor authentication in their premium plugin (as of this writing it is not available).


[…] I spent a fair amount of time looking into several two-factor authentication plugins, and ended up writing about 3 particular Clef replacements that I liked. Now comes new from the developers of UpdraftPlus, one of the top backup plugins for […]